Here is a complete step-by-step guide to how you install and configure the Holio Shipping app available in Shopify Store here.
Once you’ve set up the app, read this article to learn how to use it.
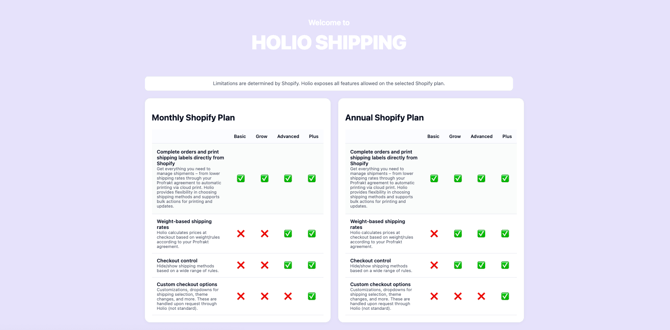
Note: Some features are limited by your Shopify plan. See overview.
1. Go to the Shopify App Store and download the “Holio Shipping” app. When downloaded, read the highlighted descriptions in each box to get a quick summary of the main functions.

2. Once the app is downloaded, go to “Setup” and enter the API key from the Profrakt Portal.
NB! Sandbox mode should not be checked, unless you have this agreed with us. For testing, you can set up and hide/show shipping options.
NB! PIO Configuration must only be used after agreeing with Profrakt/Holio-team

3. After connecting the API key, proceed to “Locations”, where you can configure your shipping locations and, If applicable, link your Profrakt cloud printers.
⚠️ Important
Before continuing, make sure you have a location set up in your Shopify settings and change to the desired sender name and a sender address registered in your Profrakt portal.
If you offer international (non-domestic) shipping in Shopify → Settings → Shipping and Delivery → General Shipping Rates, you must remove Holio Shipping rates for those markets.
At the moment, Holio Shipping can only be used with Profrakt freight agreements within Norway.


4. To add a new shipping option, select Carrier and Shipping method, and optionally enter a Custom name to be displayed at checkout.
Tip! We recommend taking some time to understand how the different rules work and how they affect the checkout experience. This will help improve conversion rates and create a better experience for both you and your customers.

5. Next, choose the available services and specify the Pricing type along with rules for minimum and maximum weight. Finally, you can enable additional settings such as free shipping or hiding the option at checkout, before saving by clicking Add shipping option.
Tip! If you have weight rules, please check your product weights in Shopify. You can easily go through many products at the same time using "Bulk edit" on product page in Shopify.

6. Send orders with Holio Shipping
In the order overview, select the orders you want to create shipping labels for. Then click “Fulfill with Holio.”
If you want to use an external printer, check “Print labels”, and the labels will be downloaded automatically. The first time, you may need to allow the pop-up in your browser.


Learn more about:
NB! We always recommend you to do a few tests in your webshop to check if everything is working like you want it to.
Feature access determined by your Shopify plan:
Need assistance? Please book a meting.